Photography Composition Exercises: 10 Drills in an Hour
 by Marco Carotenuto · · 9 min read
Reading about composition isn’t enough: you learn it by making the same choice ten different ways in a row and looking at what changes. This guide gives you ten photography composition exercises you can do in one hour, in a single place, each with a yes/no check, so at the end of every drill you know whether the shot works without waiting for anyone’s opinion.
For each drill you get what to do, why it works and how to tell you passed. The deeper theory on each topic lives in the other articles on this blog; here the goal is to train your eye, not repeat the lessons.
How do you practice composition in one hour?
Pick a small place, set a timer and give each drill six minutes: four to shoot, one to check, one to write a one-line note. A courtyard, a square or a park is fine. Stay within roughly fifty meters of where you started, because the point is to change the framing, not the location.
Three rules keep the session useful:
- One check per drill. Don’t judge the photo overall; answer only that drill’s question, yes or no.
- No deleting on the spot. Review everything at the end with the same yardstick. On a small screen, slight tilts and messy edges slip through.
- A one-line note. “With the subject on a third the shot breathes, in the center it doesn’t”: writing forces you to turn an impression into a rule.
| # | Drill | What it trains | Check (yes/no) |
|---|---|---|---|
| 1 | Three positions | Subject placement | Is there more room in front of the subject than behind it? |
| 2 | Live emptiness | Negative space | In a thumbnail, do you find the subject in one second? |
| 3 | The two crops | Horizon line | Does one of the two halves lose a lot when you cover it? |
| 4 | A line that arrives | Leading lines | Does the line end on the subject? |
| 5 | Three layers | Foreground and depth | If you cover the foreground, does the photo lose something? |
| 6 | Three heights | Camera position | Is the background cleaner at one of the three? |
| 7 | The edge walk | Frame margins | Is nothing cut off or grazed by an edge? |
| 8 | Two steps sideways | Tangents and mergers | Does the mistake you found disappear when you move? |
| 9 | Vertical and horizontal | Orientation | Does your chosen format suit the direction of the scene? |
| 10 | The best three | Selection | Can you say in one sentence why they work? |
Where do you put the subject? (drills 1-3)
The first three drills are about where things sit in the frame: the subject, the emptiness and the line that separates sky from ground. You make these choices first, and they shape everything that follows.
1. Three positions. Pick a subject with a direction (a bicycle leaning on a wall, a person walking, a dog, an open door) and shoot the same viewpoint three times: subject in the center, on the left third, on the right third. Check: is there more room ahead, in the direction of the gaze or movement, than behind? The rule of thirds explains why: crowd a subject against the edge it’s heading for and the photo feels stuck.
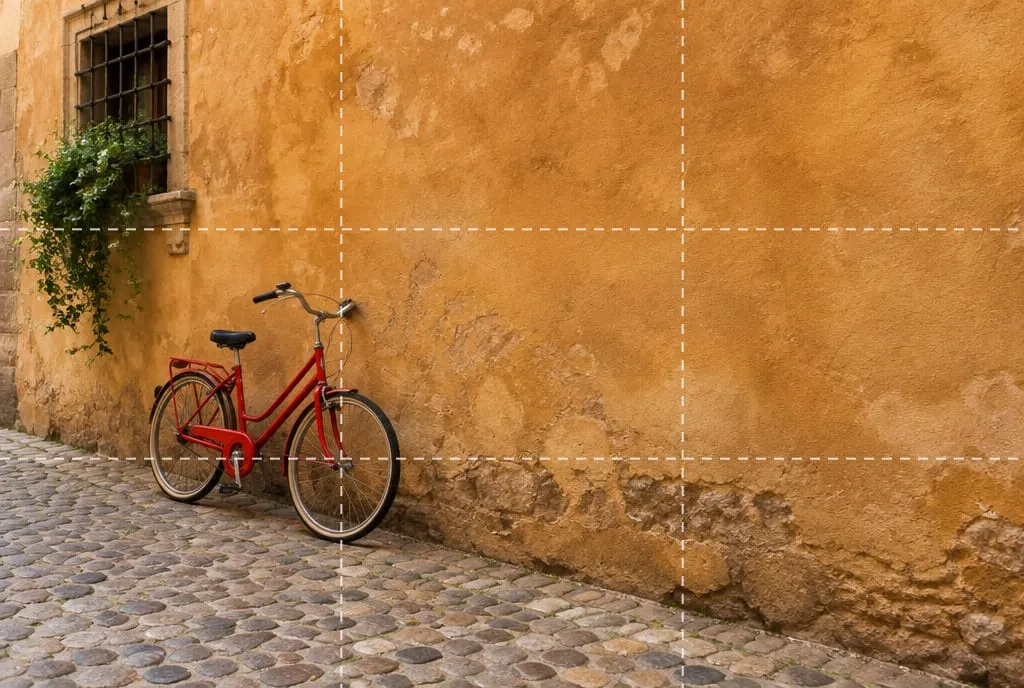 The subject sits mostly in the left third of the grid and the wall fills the rest: one of the three variations in drill 1. Generated image to illustrate the concept, not a real photo of a real place.
2. Live emptiness. With the same subject, step back until it fills less than a third of the frame and the rest is a uniform surface (a wall, sky, water, short grass). Check: shrink the photo to a thumbnail, or squint at the screen. If you find the subject in a second and nothing competes, the space is alive. If your eye bounces around, it’s just space you haven’t decided on; see the article on negative space.
3. The two crops. Find a line that divides two zones (a riverbank, rooftops against the sky, a hedge) and shoot three times: line high, in the middle, low. In each shot cover one half with your hand, then the other. Check: does one of the two halves lose a lot when covered? If so, that half deserves more space; if neither loses anything, the scene has no protagonist yet. The method is covered in full in horizon placement.
How do you guide the eye through the frame? (drills 4-6)
A photo works when the eye knows where to enter, where to go and where to rest. The next three drills are about that path: the line that carries it, the layers that give depth, the camera position.
4. A line that arrives. Find a real line in the scene (a low wall, a path, a railing, the shadow of a pole) and frame so it enters from an edge or a corner and reaches the subject. Check: does the line end on the subject? If it runs past it and disappears against the opposite edge, the eye leaves with it: crop, change viewpoint or put something strong where the line should stop. The six types of line are in leading lines in photography.
5. Three layers. Build a frame with a foreground, a middle ground and a background you can tell apart, at clearly different distances. Check: cover the bottom strip of the photo with your hand; if the photo loses nothing, that foreground is filler and should be changed, moved or dropped. Having something low in the frame isn’t enough: it must give an entry point, a sense of scale or a connection, as explained in foreground in landscape photography. Andrew Gibson at Creative Photographer also suggests composing in layers: more order to impose on the scene, but more depth in return.
 Foreground, middle ground and background are distinct: cover the flowers and boulder at the bottom and the photo loses its entry point and its scale. Generated image to illustrate the concept, not a real photo of a real place.
6. Three heights. Pick a still subject and shoot it from three heights: kneeling or almost on the ground, at eye level, with the camera held above your head. Check: at one of the three, is the background cleaner and does the subject separate better? Going lower makes nearby elements bigger and sets them apart from the background; going higher shows more ground and usually flattens the scene. There is no single right height: the drill shows how much changes with a few inches.
How do you keep the frame clean? (drills 7-9)
Many failed photos have a good idea and one small mistake at the margins. Drills 7, 8 and 9 are designed to help you see it before you press the shutter.
7. The edge walk. Frame a subject with some surroundings and, before shooting, run your eyes along the four edges of the screen, one at a time. Check: is nothing cut in half, and nothing grazing the edge without deciding whether to be in or out? An object that exactly touches the margin, like a rooftop or a branch tip, creates what’s called a tangent, and Photography Icon describes it as a point of tension that draws the eye and, when two outlines touch perfectly, flattens the scene.
8. Two steps sideways. Shoot a mistake on purpose: a pole that seems to grow out of someone’s head, a horizon line crossing a neck, two objects that barely overlap. Then move two steps, or raise or lower the camera, and shoot again. Check: does the mistake disappear without ruining the rest? This is the merger described by the same source: two elements fusing into one confusing shape. Making the mistake deliberately trains you to spot it beforehand, because in person your eye filters it out and the camera doesn’t. For a horizon that touches the subject, see also the horizon article.
9. Vertical and horizontal. Photograph the same scene twice, once horizontal and once vertical, without moving. Check: does the format you pick follow the direction of the scene? Horizontal usually suits scenes that spread sideways (a shoreline, a row of houses), vertical those that rise or recede (a bell tower, a path climbing a hill). If you pick a format out of habit rather than for the scene, you’ve found an autopilot worth breaking.
How do you pick the best shot at the end? (drill 10)
The last drill is choosing, because composing also means knowing what worked. You have thirty or forty shots: six minutes is enough if you compare rather than browse.
10. The best three. Put the session’s photos on screen and pick the best three, then write one sentence for each saying which composition choice makes it work (“the empty space is on the left, where the subject looks”). Check: can you say in one sentence why they work? If the sentence is “I like it”, you don’t have a rule yet. For the full selection method, see how to cull your photos in 20 minutes, and for the criteria to judge each shot, the guide to the six criteria for telling if a photo is good.
How does Framia rate this?
These drills mainly train the composition criterion: subject position, empty space, lines, layers, edges. For an outside read, upload the photo you chose in drill 10 to Framia and look at the composition score and its explanation: it tells you whether the choice you had in mind really shows in the frame.
What to do next
One full session, to repeat once a week for a month:
- Pick a small place, set a six-minute timer and open a notebook or your phone’s notes.
- Run drills 1 to 9, one every six minutes: four minutes shooting, one for the yes/no check, one for the one-line note.
- Mark each check yes or no. Don’t redo the shot on the spot: keep moving.
- When the clock runs out, do drill 10 and choose the three best photos with the sentence that says why.
- Count your “no” answers: the drill with the most is the one to repeat on its own for three days, with a different subject.
- Next week, change location and compare your notes: the checks that keep failing are the habits to fix.
FAQ
How long before I see an improvement?
After the first hour you'll see which checks you usually skip, often the edges and the room in front of the subject. To make the checks a habit, repeat the session once a week for a month in a different place and compare your notes.
Do I need a DSLR and several lenses?
No. The drills work with a smartphone or with a camera and a single lens. A fixed focal length is even better because it forces you to move your feet, which is the most useful habit to build. All you need is a timer and a notebook, even the one on your phone.
Does the location have to be beautiful?
No, and an ordinary one is better: a courtyard, a street or a local park makes the drills clearer, because you're not distracted by the scenery. Composition is easiest to see when the subject is plain and the only thing changing is how you frame it.
What if a drill doesn't work out?
Write down which check you failed and why: that is the most useful result of the session. Then repeat only that drill for a few days with a different subject. There's no need to hurry on to the next one.
Can I do these at home?
Yes, with a few swaps: a table with three objects for layers, a table edge or the rooftops outside a window for the dividing line, an open door for lines. The session still takes an hour, but pick a room with natural light.