Wide-Angle Photography Tips: 7 Mistakes to Avoid
 by Marco Carotenuto · · 8 min read
You put on your wide-angle lens, look through the viewfinder, and everything feels huge and dramatic. Then you open the file at home: the mountain is a speck, the foreground is a patch of grass with nothing in it, the sky fills half the frame, and the trees at the sides lean inward. The lens isn’t the problem. A wide angle magnifies every decision you make, the good ones and the bad ones.
These wide-angle photography tips cover the seven mistakes we see most often, why each one happens, and what to change in the field. If you want a refresher on what focal length is and why perspective depends on distance, start with the guide to focal length.
Why do my wide-angle photos look empty?
Because a wide-angle lens shrinks everything that’s far away. With a wide angle of view, as Cambridge in Colour explains, nearby objects look gigantic and distant ones look tiny, so the peak that dominated the view in person ends up as a thin strip above the horizon.
That’s mistake number one, and the most common: using the wide angle to “get it all in.” The same source calls it a misconception that wide-angle lenses are mainly for when you can’t step back far enough; they’re often used for the opposite, to get closer to something. If your subject is far away and there’s nothing interesting in front of you, a different focal length is probably the right call: zoom in, shoot both, and compare.
On photography tours we see the same scene again and again: everyone has the ultra-wide on in front of a big view, and the strongest frames come from the people who, after a few shots, start looking at what’s three feet from their boots.
How close should I get to the foreground with a wide-angle lens?
Much closer than feels natural: often less than a meter (about three feet), sometimes a few inches. Cambridge in Colour recommends getting as close as possible to the nearest subject, because exaggerating relative size is exactly what creates depth. Mistake number two is shooting standing up, at eye level, with the foreground ten or twelve feet away: too far to matter, too close to disappear.
Getting low helps, but not always. Go too low and the middle distance collapses, with layers stacking on top of each other; stay too high and a dead gap opens up between foreground and background. Look for the camera height where foreground, middle ground and subject stay separate. For choosing the right element, see foreground in landscape photography.
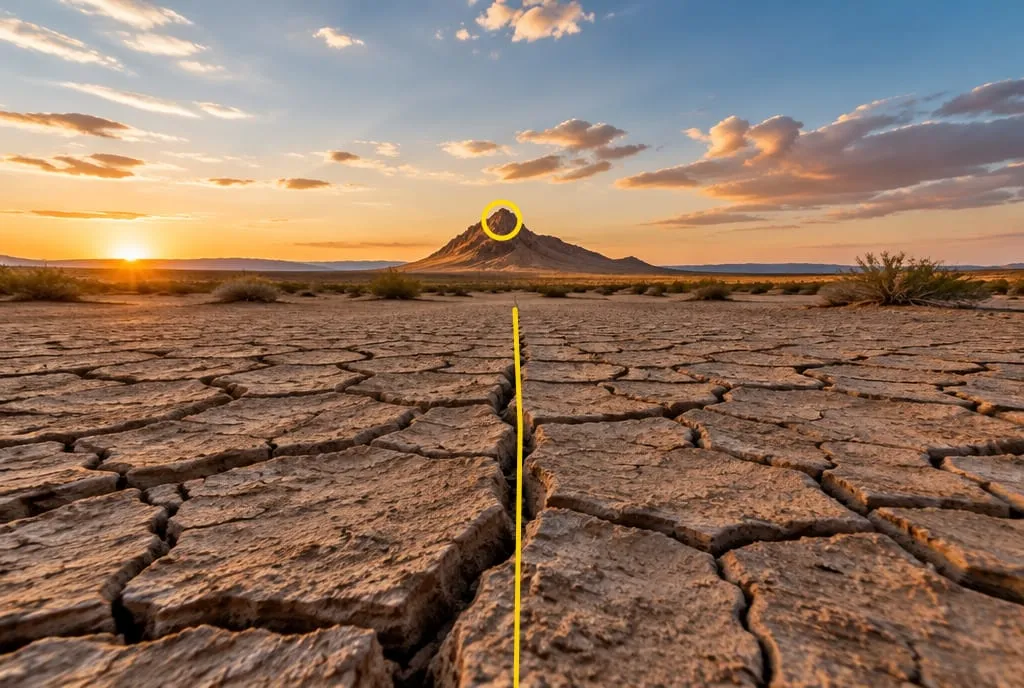 From a foot or so away, the mud plates turn huge and the central crack (in yellow) carries the eye to the mountain. The foreground has a job: it doesn’t fill space, it leads. AI-generated image to illustrate the concept.
One practical warning: this close, moving the camera half an inch shifts the foreground a lot in the frame. Compose slowly, ideally on a tripod, and check the edges before you press the shutter.
How do I stop buildings and trees from leaning with a wide-angle lens?
Keep the sensor parallel to whatever has vertical lines: don’t tilt the camera up or down. Mistake number three is pointing the lens upward to fit in the top of a building or a tree. Cambridge in Colour explains that any lens aimed above or below the horizon makes parallel verticals converge; with a wide angle you just see more of those lines, and even small tilts move the vanishing point a lot.
The same source lists four ways to deal with it:
- Keep the camera level and crop away the extra foreground later, at the cost of some resolution.
- Step back and use a longer focal length, if there’s room.
- Correct perspective in editing, again losing some of the edges.
- Use a tilt-shift lens, which is expensive but precise.
Converging lines aren’t always a flaw, though. If you go after them on purpose, they can give a scene real energy.
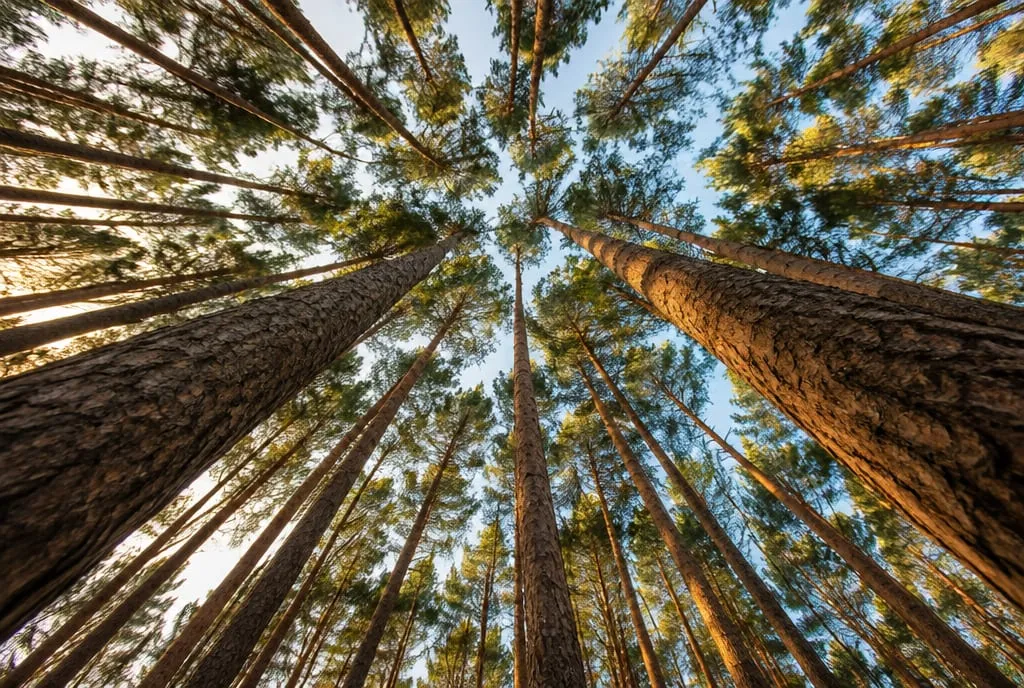 Camera pointed straight up: parallel trunks appear to converge toward the center. Here the convergence is the picture; in front of a building facade it would be a mistake. AI-generated image to illustrate the concept.
A simple rule: either your verticals are straight, or they converge so strongly that it’s clearly deliberate. A slight lean somewhere in between reads as a slip.
Why do people at the edge of a wide-angle photo look stretched?
Because with a rectilinear wide-angle lens, objects near the edges of the frame stretch outward, away from the center. Cambridge in Colour calls this edge distortion. Mistake number four is placing a person, a head or a round shape (a moon, a wheel, a dome) near a corner, where it turns into an oval.
The fix is easy: keep people and shapes your viewer knows well toward the middle. For ultra-wide portraits, B&H recommends keeping the subject in the center third of the frame. Leave the edges to rocks, grass and trees: things whose “correct” shape nobody knows, so they can stretch without bothering anyone.
Mistake number five also involves people, but for a different reason: distance. If you fill the frame with a face using a wide-angle lens, you’re so close that the nose is much nearer to the lens than the ears, and it looks oversized. That’s a distance problem, not a lens defect: for a tight portrait, step back and use a longer focal length, or include the surroundings and let the person be smaller in the frame.
Is barrel distortion the same as converging verticals?
No. Mistake number six is mixing up different effects that have different fixes. Barrel distortion is an optical flaw: Canon explains that wide-angle lenses tend to bow straight lines outward, and that on ultra-wides it can make horizons look curved and buildings look wrapped around a cylinder. Converging verticals and edge stretching, on the other hand, come from perspective and angle of view, and no lens profile removes them.
| Effect | What causes it | How you spot it | How you fix it |
|---|---|---|---|
| Barrel distortion | The lens’s optical design | Straight lines bowing outward, especially near the edges | Lens profile in camera or in your RAW editor |
| Converging verticals | Camera tilted up or down | Verticals that converge, buildings that lean back | Level camera, more distance, perspective correction, tilt-shift |
| Edge stretching | Very wide angle of view | Faces, spheres and people elongated in the corners | Recognizable shapes toward the center |
| Distorted faces | Standing too close to the subject | Big nose, small ears | Step back and use a longer focal length |
A useful detail: Cambridge in Colour notes that barrel distortion bends lines that don’t pass through the center of the image. A horizon placed very low or very high in the frame bends more than one in the middle, so if you put it near an edge, apply the lens profile before deciding whether it’s straight. For where to put it in the first place, see horizon placement in photography.
Can you use a polarizer on a wide-angle lens?
Yes, but watch the sky, because the wider the angle, the more likely the filter is to darken it unevenly. The sources disagree here: Cambridge in Colour says a polarizer should almost always be avoided on a wide angle, while B&H recommends one to make clouds and color pop. Mistake number seven is screwing it on without checking what it does. As Cambridge in Colour explains, the effect is strongest when you shoot at 90° to the sun and weakest when the sun is in front of you or behind you. With an ultra-wide, one side of the frame can sit near the maximum and the other near the minimum, so a clear blue sky comes out darker on one side than the other.
If you use one, turn the filter while looking through the viewfinder: if a dark band appears in the sky, dial the effect back or take it off. The same goes for light in general: a wide angle easily takes in a bright sky and a shaded foreground at once, and the sun often ends up in the frame, which raises the risk of flare. For high contrast, consider a graduated filter or two exposures blended together; for flare, try hiding the sun behind something in the scene.
What to do next
The one-meter drill trains your eye for wide angles. You need thirty minutes, your widest focal length (your phone’s 0.5x works too), and a scene with something interesting low down and a clear subject in the background.
- Baseline shot. Standing, about four meters (13 feet) from the foreground element, frame the scene the way you normally would.
- Move to one meter (about three feet) and lower the camera to knee height. Shoot.
- Get within 30-50 cm (one to one and a half feet) of the element, almost at ground level. Shoot, checking that the foreground doesn’t overlap the subject.
- Check the edges of your best frame: no people or round shapes in the corners, nothing cut in half.
- Reshoot the best frame with the camera tilted up, then perfectly level, if there are trees, poles or buildings in the scene. Compare the verticals.
- Apply the lens profile in your editor and see what changes on the horizon and on lines near the edges.
To get everything sharp from the foreground to infinity, work out your focus point with the hyperfocal distance guide. If you’d like an outside opinion, upload your best frame and your baseline shot to Framia: each gets a score and an explanation across six categories, including Optics and Composition, so you can see whether stepping closer actually made a stronger photo.
FAQ
What focal length counts as wide-angle or ultra-wide?
There is no single cutoff. Cambridge in Colour calls anything below roughly 35mm on full frame wide-angle and says ultra-wide starts around 20-24mm; B&H draws the line between the two at 28mm. On a crop sensor, divide by the crop factor: a 10-18mm on a 1.5x body frames roughly like a 15-27mm on full frame.
Do wide-angle lenses have more depth of field?
Only when you shoot from the same distance at the same aperture. Cambridge in Colour points out that if the subject fills the same share of the frame, depth of field is practically the same with a wide-angle and a telephoto lens. The reputation comes from the fact that wide-angle shots usually include much more of the scene.
Is my phone's 0.5x camera a real wide-angle lens?
Yes, on many phones it is an ultra-wide, and the same rules apply: get close to the foreground, hold the phone level in front of buildings, and keep faces away from the edges of the frame.
Should I fix distortion in camera or in editing?
If you shoot JPEG, turn on the camera's distortion correction if it has one. If you shoot RAW, apply the lens profile in your editor: Canon notes that many editing apps read the lens data stored in the file and apply the correction automatically. Either way, the edges of the frame get cropped slightly.