Depth of Field: What It Is and How to Control It
 by Marco Carotenuto · · 10 min read

You shot a portrait at f/1.8 and the eye is sharp but the tip of the nose is not. Or you shot a landscape where the mountains are crisp and the rock in front is a smudge. Both come down to the same thing: depth of field, how much of the scene stays sharp in front of and behind the point you focused on.
This guide covers what it is, which factors really change it (with a chart of calculated numbers, not guesses), why “wide-angle lenses have more depth of field” is only half true, and how to choose the right amount before you press the shutter. At the end there is a 20-minute exercise you can do at your kitchen table.
What is depth of field in photography?
It is the distance between the nearest and farthest points in the scene that look acceptably sharp in the photo. A lens focuses precisely on a single plane; in front of and behind it, sharpness falls off gradually, and as long as you cannot see the drop, those objects look in focus.
The line between “sharp” and “blurred” is perceptual, not physical. Every out-of-focus point lands on the sensor as a tiny disc instead of a dot. As long as the disc is small enough, your eye reads it as a dot: the largest acceptable size is called the circle of confusion. Cambridge in Colour defines it in terms of a standard 8x10 inch print viewed from about a foot away, which is why print size and viewing distance change how much depth of field you perceive, and why different charts and calculators give slightly different numbers.
Two practical consequences:
- The same photo can look sharp on the camera screen and soft on your monitor. Enlarge it and the discs become visible, so the depth of field you perceive shrinks.
- The transition is gradual. There is no line where everything suddenly goes soft. There is a falloff, and that falloff is what you use to separate a subject from its background.
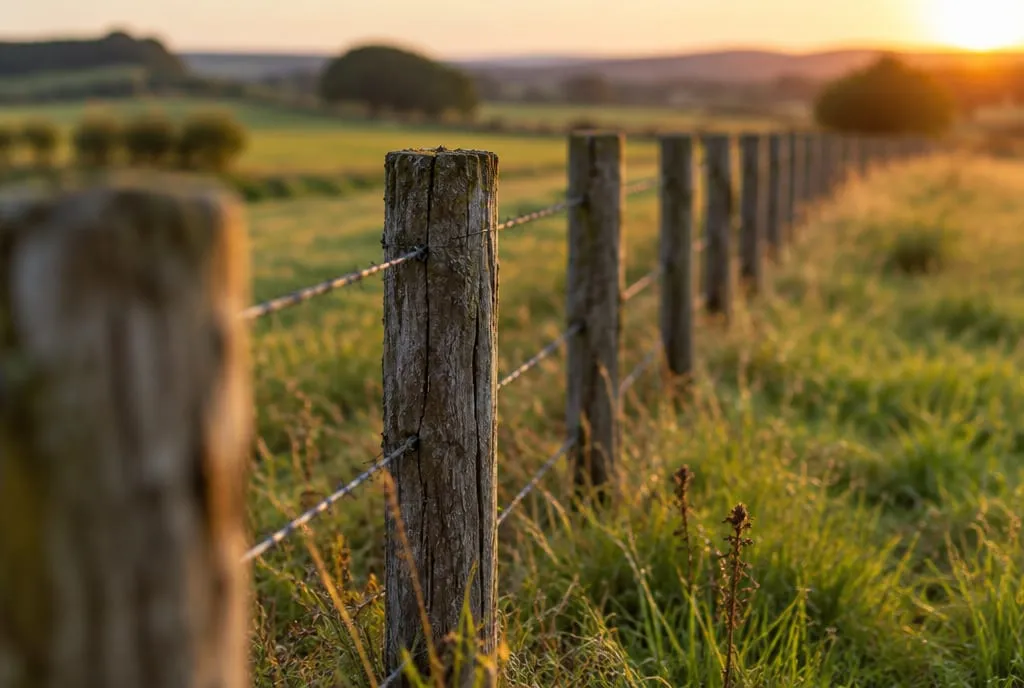 Focus is on the second post: the nearest one is soft, and the ones beyond it soften step by step. Depth of field is a gradient, not a hard edge. Image generated to illustrate the concept.
What affects depth of field?
Two factors set it directly: aperture and focus distance. Focal length and sensor size matter through how much they magnify the subject. That is how Cambridge in Colour puts it, and it is also the most useful way to think about it in the field.
To make it concrete, we calculated depth of field with the standard formula, for full frame with a 0.03 mm circle of confusion (a stricter or looser value shifts the numbers a little):
| Setup | Sharp zone | Total depth |
|---|---|---|
| 50mm, subject at 2 m (6.6 ft), f/1.8 | 1.92 to 2.09 m | about 17 cm (7 in) |
| 50mm, subject at 2 m, f/4 | 1.83 to 2.21 m | about 38 cm (15 in) |
| 50mm, subject at 2 m, f/8 | 1.68 to 2.46 m | about 78 cm (31 in) |
| 50mm, subject at 2 m, f/16 | 1.46 to 3.20 m | about 1.7 m (5.7 ft) |
| 50mm, subject at 5 m (16 ft), f/4 | 4.04 to 6.56 m | about 2.5 m (8.4 ft) |
| 24mm, subject at 2 m, f/4 | 1.42 to 3.40 m | about 2 m (6.5 ft) |
| 85mm, subject at 3.4 m (11 ft), f/4 | 3.22 to 3.60 m | about 38 cm (15 in) |
Read it one lever at a time:
- Aperture. From f/1.8 to f/16, with the subject still at 2 m, the sharp zone grows from 17 cm to almost 2 m. Stopping down (a higher f-number) increases depth of field; opening up reduces it.
- Distance. At f/4, stepping back from 2 m to 5 m takes depth of field from 38 cm to 2.5 m. The closer you are, the less you get, which is why macro work is a matter of millimetres even at small apertures.
- Focal length, same position. Standing at 2 m, the 24mm at f/4 gives about 2 m of depth against 38 cm for the 50mm. But the subject is much smaller in the frame.
- Focal length, same framing. The 85mm at 3.4 m frames the subject the same size as the 50mm at 2 m, and depth of field is the same: about 38 cm. This is the row that surprises most people.
Do wide-angle lenses really have more depth of field?
Yes if you stay where you are; hardly at all if you move closer to fill the frame the same way. The sources are more nuanced than the rule of thumb. Photography Life shows it with two shots at 35mm and 70mm with the subject the same size in the frame: depth of field is the same. Cambridge in Colour adds a caveat: total depth stays nearly constant, but with a wide angle more of it sits behind the subject, and near the hyperfocal distance a wide angle can genuinely give you more.
So why does the background look so much blurrier with a telephoto lens? Because the narrow angle of view takes in a smaller slice of the background and enlarges it, blur included. That effect is real and useful, but it is about how the out-of-focus background looks, not about how deep the sharp zone is. We cover it in focal length and perspective.
In practice: if you want a softer background behind a portrait, step back and use a longer focal length, or move the subject away from the background. If you want more of the scene sharp, stop down or take a step back.
Does a smaller sensor give more depth of field?
For the same framing and the same f-number, yes. A smaller sensor needs a shorter real focal length to get the same framing, and depth of field grows. In our calculation (with a 0.02 mm circle of confusion for APS-C), a 33mm lens on APS-C at f/1.8 (framing similar to a 50mm on full frame) at 2 m gives about 26 cm of sharp zone, against 17 cm on full frame. To get the same look on full frame you would stop down to about f/2.8.
Photography Life sums up the rule: to match depth of field across sensor sizes, multiply the f-number by the crop factor. It works the other way too: f/1.8 on APS-C, for the same framing, blurs the background roughly like f/2.8 on full frame. That is also why phones, with their tiny sensors, keep almost everything in focus and rely on software to fake a blurred background.
Where does depth of field fall around the subject?
Usually not half and half. Cambridge in Colour shows that the split depends on distance and focal length: up close it approaches 50/50, and with wide angles it shifts towards the back. The common rule of thumb, roughly one third in front and two thirds behind, only holds at certain distances. For the 50mm at 2 m and f/8 in the chart, the zone runs from 32 cm in front to 46 cm behind: closer to a 40/60 split than to one third and two thirds.
The practical takeaway is simple: focus on what matters most, not on the middle of the scene. For a group of people in several rows, focus on the front or middle row, never the back one, because depth of field extends further behind than in front. In landscapes, if you want everything sharp from the foreground to the horizon, the most precise method is hyperfocal distance.
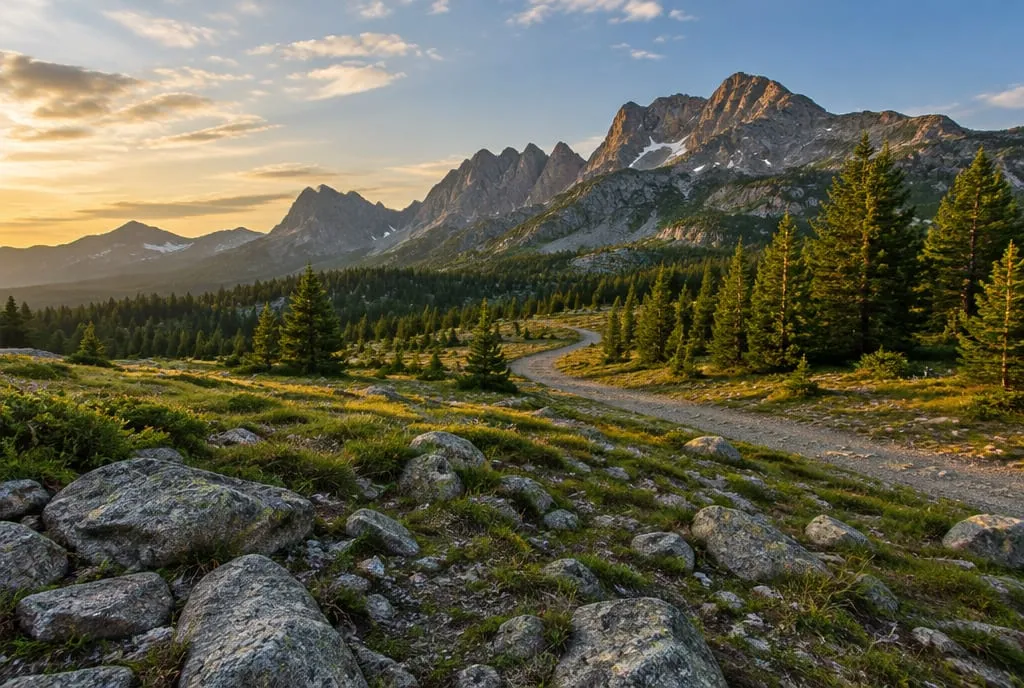 Deep depth of field: boulders, trail and peaks are all sharp. You get there with a short focal length, a smaller aperture and a carefully chosen focus point, not by focusing on the mountains. Image generated to illustrate the concept.
How much depth of field do you need?
Enough to make the subject clear, and no more. There is no correct aperture per genre, but there are sensible starting points that you then adjust by looking at the photo:
| Situation | What you want | Starting point |
|---|---|---|
| Portrait of one person | Sharp face, soft background | Wide aperture (f/1.8-f/2.8 on full frame), focus on the nearest eye |
| Two or more people at different depths | Every face sharp | Stop down to f/5.6-f/8, or line them up on the same plane |
| Close-up of a detail or flower | The whole subject sharp | Smaller than you expect (f/8-f/11): up close the zone is thin |
| Landscape with a foreground | Everything sharp | Short focal length, f/8-f/11, focus at the hyperfocal distance |
| Landscape with no foreground | Everything sharp | f/8 is almost always enough, focus on the main element |
Two caveats. First, stopping all the way down is not free: Cambridge in Colour points out that at very small apertures diffraction softens the whole image, including the plane of focus. Second, a smaller aperture means less light, so slower shutter speeds or higher ISO; how to balance the three is covered in the exposure triangle.
On our photography tours we often see the opposite of the wide-open portrait: landscapes shot at f/16 or f/22 “just to be safe”, with focus left on the mountains. The result is an image slightly softened everywhere by diffraction. With a 24mm lens on full frame, for example, f/22 focused at infinity and f/11 focused at the hyperfocal distance both keep everything sharp from about 90 cm (3 ft) onward: moving the focus point closer would have let you avoid stopping down that far.
How do you check depth of field before you shoot?
Zoom into the preview instead of trusting the viewfinder. On a DSLR, the optical viewfinder shows the scene at the lens’s widest aperture, so with less depth than you will actually get: the depth-of-field preview button stops the lens down and shows you the real result, although at small apertures the view gets dark. Mirrorless cameras usually simulate the set aperture on screen already, and focus peaking, where your camera offers it, highlights the highest-contrast edges, which are the ones in focus.
The most reliable check is still a test shot magnified to 100% on the screen: look at the nearest and farthest edges of whatever needs to be sharp. If autofocus grabs the wrong spot, depth of field will not save you, so revisit the autofocus modes and pick a single AF point.
What to do next
The six-shot exercise: 20 minutes, a table and five similar objects (mugs, bottles, books standing upright).
- Line the objects up diagonally on the table, about 15-20 cm (6-8 in) apart, with a wall or window behind them.
- Set aperture priority (A or Av) and pick your lens’s widest aperture. Focus on the second object with a single AF point.
- Shots 1 and 2: aperture. Shoot wide open, then at f/8 without moving. Count how many objects are sharp in each.
- Shot 3: distance. Go back to wide open, take a step back and refocus on the second object. Count again.
- Shots 4 and 5: framing. If you have a zoom, shoot at the shortest focal length from close up and at the longest from farther back, with the second object the same size in the frame and the same aperture. Compare the sharp objects, then look at the background.
- Shot 6: focus point. At f/8, focus on the last object and compare with shot 2: how many objects in front did you lose?
When you are done, write down which lever changed the result most with your gear. If you want an outside opinion, upload the best photo of the series to Framia: the Optics category gives you a score from 0 to 100 and a concrete explanation of what works and what does not.
FAQ
Do shutter speed or ISO change depth of field?
No. Depth of field depends on aperture, distance, focal length and sensor format. If changing the shutter speed seems to change sharpness, the camera has usually changed the aperture to keep the exposure the same, for example in auto or shutter priority mode.
Why is it so hard to blur the background with a phone?
Because the sensor is tiny and the real focal length very short: for the same framing, depth of field is much deeper than on a camera with a large sensor. Phone portrait modes fake the blurred background in software by estimating how far away things in the scene are.
Is depth of field split evenly in front of and behind the subject?
Rarely exactly. Up close the split gets close to 50/50; at longer distances the part behind the focus point grows larger than the part in front, until it becomes infinite when you focus at the hyperfocal distance.
Which aperture should I use if I am not sure?
For a person or a close object against a soft background, start with the widest aperture that keeps the whole subject sharp. For a landscape with a foreground, start at f/8 or f/11 and zoom in on the screen to check. Then adjust based on the photo, not the theory.