Why Do My Photos Look Flat? 7 Causes and Fixes
 by Marco Carotenuto · · 8 min read
You get home convinced you nailed a shot, open it on your computer, and it looks like a faded postcard. The scene was gorgeous; the photo isn’t. Almost every photographer who is still growing runs into this, and it’s one of the most fixable problems there is, because a flat photo nearly always has a specific cause.
Below are the seven most common causes, four quick tests that tell you which one is yours, and a fix for each. If you want the bigger picture of how to judge a shot, start with how to tell if a photo is good.
Why does a photo look flat?
A photograph is a two-dimensional surface: the depth isn’t in it, the viewer infers it. The brain rebuilds depth from a handful of cues, and when too many are missing the scene collapses onto a single plane.
The four main cues:
- Shadows and directional light. When one object casts a shadow on another, we understand which one is in front.
- Tonal contrast. Clear differences between light and dark areas give shapes and surfaces volume.
- Overlapping layers. An element that partly covers another is obviously closer.
- Perspective and relative size. Similar objects shrinking toward the back and lines that converge tell you how deep the scene runs.
If your photo is flat, at least one of these is missing. The job is to find out which.
How do you find the cause with 4 tests?
These checks take under two minutes per photo and work on any shot, on a monitor or on the back of the camera. Run all four: often there are two causes at once.
| Test | How to do it | What it tells you |
|---|---|---|
| Shadows | Look for shadows: are there any, and do they fall to the side? | None, or only behind the subject: flat light (causes 1 and 2) |
| Histogram | Check the histogram: are the tones bunched in the middle? | If so, low contrast (cause 3) |
| Cover the foreground | Cover the bottom of the image with a finger: does anything change? | If nothing changes, there’s no foreground adding depth (cause 4) |
| Black and white | Convert it to black and white: does the subject blend into the background? | If so, weak tonal or color separation (cause 5) |
A bonus clue comes from the lines: if everything runs parallel to the frame edges, you’re probably shooting straight-on (cause 6). The rest you can see in the photo itself.
Causes 1 and 2: is the light too even or too frontal?
These are the most common causes. Even light comes from everywhere, like under an overcast sky or in open shade: it leaves no shadows and the subject looks printed on the scene. Frontal light comes from behind you, parallel to the lens axis: shadows fall behind the subject where you can’t see them.
The fix is to change the direction of the light, not to polish the file:
- With a low sun, move 90 degrees relative to it. Side light sculpts relief and texture; backlight draws outlines.
- Wait for the first and last hours of the day, when low sun stretches the shadows.
- Under an overcast sky, don’t chase depth through shadow: look for color, shapes, texture and overlapping layers, or pick a subject that thrives in soft light.
- Indoors, bring the subject close to a side window instead of relying on ceiling light.
The example below shows what happens in a landscape with no shadows and no layered structure: meadow, forest and mountains share the same brightness and read as one band.
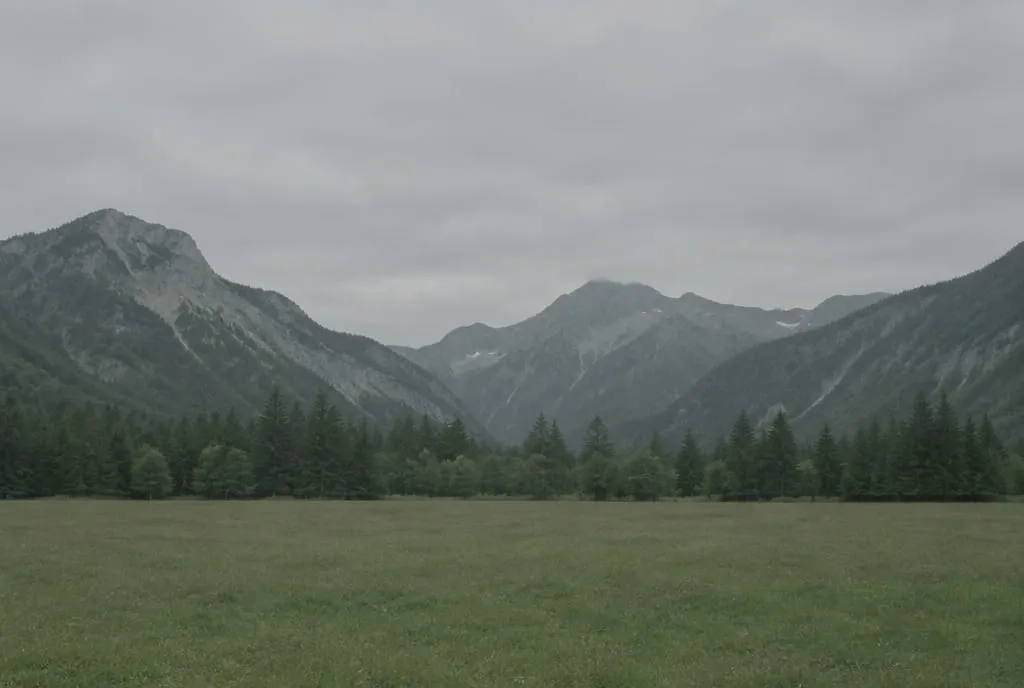 Generated example illustrating the concept: with even light, every element lands on similar mid-tones and the scene loses depth.
Cause 3: is the tonal contrast too low?
If the histogram is a lump in the middle that reaches neither the left nor the right edge, the image has few true blacks and whites and looks grayish. The histogram plots the distribution of tones, shadows on the left, highlights on the right; an image with a wide tonal range fills most of it, as the Cambridge in Colour guide explains.
What to do:
- When shooting, look for light where the difference between bright and dark areas is greatest, or frame something dark next to something bright.
- Dial exposure compensation down a third or half a stop if the highlights are already close to clipping: colors get richer and the sky less washed out.
- In editing, set the black point and white point to the edges of the histogram before touching the contrast slider. It’s a cleaner fix than a heavy curve.
One variant to watch: haze. Distant elements, because of the air between you and them, look lighter, bluer and lower in contrast. That’s aerial perspective, described on Wikipedia. It’s a useful depth cue, but if the veil also covers your subject, everything turns gray. In that case move closer, or wait for a clearer day.
Cause 4: are the foreground and layers missing?
If everything in the frame sits at the same distance, nothing overlaps anything else and the scene looks like a backdrop. Mentally split the frame into three bands and check that each has something in it.
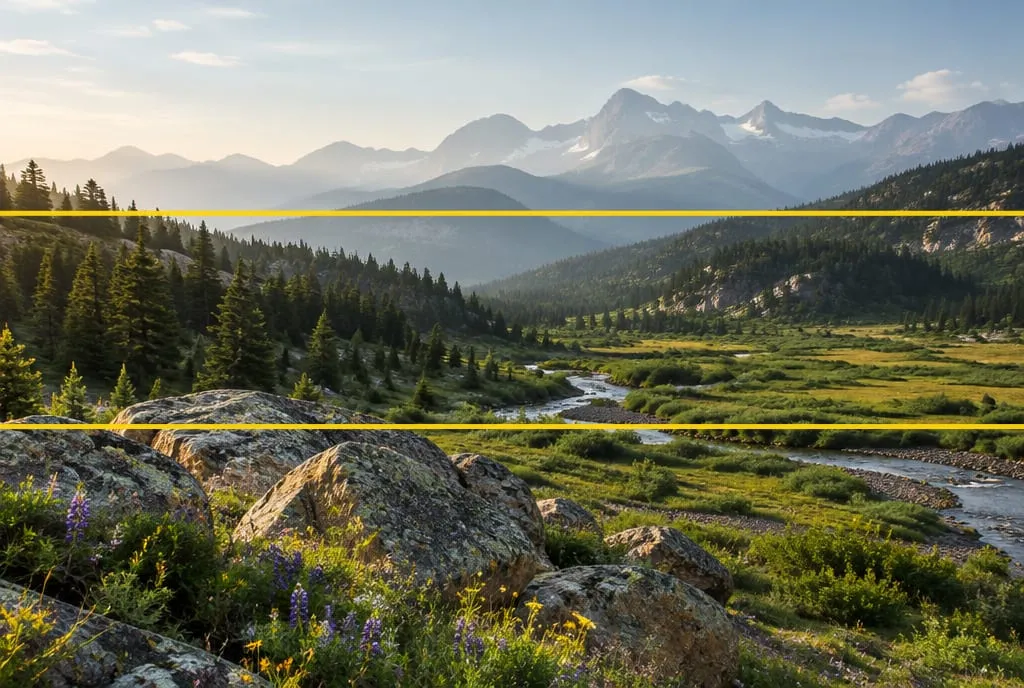 The two yellow lines split the three layers: foreground (rocks and flowers), middle ground (stream and meadow) and background (hazy ridges). Generated image illustrating the concept.
How to add layers without changing location:
- Get low. A few inches off the ground, a rock or a flower becomes a believable foreground.
- Shoot through something: a branch, an arch, a gap between rocks.
- Look for a line that leads into the image, like a path or a stream, linking the layers.
- Check the overlap: two elements that partly cover each other give more depth than two elements spaced apart.
The foreground needs a job (giving scale, guiding the eye, framing). If it’s random, in that image it just reads as clutter.
Cause 5: do the subject and background share the same tone and color?
Even in good light a photo can feel flat when the subject doesn’t separate from the background. The black-and-white test exposes it immediately: if the subject disappears in the grayscale version, it only holds up in color through a fragile balance of hue.
You can get separation three ways: tone (subject lighter or darker than the background), color (different hues, such as a red jacket on a green hillside) and sharpness (subject in focus against a blurred background). One is enough, two is better. A single step sideways that changes the background often solves it.
Cause 6: do you always shoot straight-on?
When you photograph a building, a wall or a path dead-on, the lines stay parallel to the frame and don’t converge, so nothing suggests depth. A three-quarter position, or any angle that makes edges converge, brings volume back instantly.
The same idea applies to landscapes: rather than placing a path square to the frame, pick a viewpoint from which you enter the image on a diagonal.
Cause 7: is your lens flattening things when it shouldn’t?
Focal length doesn’t change perspective; the distance you shoot from does. With a telephoto you step back to get the same framing, and from farther away the differences in distance between elements matter less, so the planes look closer together. The answers on Photography Stack Exchange make a useful point: what counts is how far the planes are relative to you, not the lens itself.
If you want more depth, move closer to the near elements and use a shorter focal length, but watch out for a wide-angle used “to fit everything in”: it can shrink the subject. If compressed planes are your goal (ridgelines stacking like stage flats), a telephoto is the right tool.
One last note for phone shooters: automatic processing often leans toward an even, cautious image. Nudging exposure down slightly can give you a richer result.
How much does a flat photo cost you in score?
A flat photo mostly loses points on the light criterion, and by chain reaction on composition and color. On Framia’s six-criteria scale, a correct shot with nothing remarkable sits in the 55-69 band. Moving up to 70-79 rarely takes better gear: it takes one more decision before the shot (where is the sun, what goes in front, where do I enter the scene).
What to do next
An exercise for a single outing, with any scene:
- Pick one still subject and take a photo “as it comes”.
- Run the 4 tests on that photo and write down which cause shows up.
- Take a second photo changing only the direction of the light (move 90 degrees or wait for the sun to drop).
- Take a third photo adding a foreground by getting low or shooting through something.
- View the three photos as thumbnails, side by side. Which has the most volume, and which change made the difference?
By the end you’ll have found the lever that works for the way you shoot. If you’d like a second opinion, upload the three photos to Framia and compare the light and composition scores: the gap shows you what each choice is worth.
FAQ
Will a better camera fix flat-looking photos?
Almost never. Flatness comes from light, composition and viewpoint, not from the sensor. A pricier camera records a flat scene more faithfully. Changing the time of day, your position or the framing makes a far bigger difference.
Is adding contrast in editing enough to fix a flat photo?
Only up to a point. Contrast in post separates tones but it doesn't create directional shadows or overlapping layers. Push it too far and you get halos and dirty colors. Use it as a finishing touch, not as the cure.
Should I avoid shooting on cloudy days?
No. Soft, diffused light is great for forests, waterfalls, details and portraits because it avoids harsh shadows. It becomes a problem in open landscapes, where shadow gives shape. There, look for overlapping layers and a subject with a strong color.
Does a telephoto lens really flatten a photo?
It depends on how you use it. With a telephoto you step back to keep the same framing, and from farther away the distance differences between elements matter less, so the planes look closer together. If compressing planes is the goal, that's a valid choice. If you want depth, move closer and use a shorter focal length.